- English
- French
- German
- Portuguese
- Spanish
- Russian
- Japanese
- Korean
- Arabic
- Greek
- German
- Turkish
- Italian
- Danish
- Romanian
- Indonesian
- Czech
- Afrikaans
- Swedish
- Polish
- Basque
- Catalan
- Esperanto
- Hindi
- Lao
- Albanian
- Amharic
- Armenian
- Azerbaijani
- Belarusian
- Bengali
- Bosnian
- Bulgarian
- Cebuano
- Chichewa
- Corsican
- Croatian
- Dutch
- Estonian
- Filipino
- Finnish
- Frisian
- Galician
- Georgian
- Gujarati
- Haitian
- Hausa
- Hawaiian
- Hebrew
- Hmong
- Hungarian
- Icelandic
- Igbo
- Javanese
- Kannada
- Kazakh
- Khmer
- Kurdish
- Kyrgyz
- Latin
- Latvian
- Lithuanian
- Luxembou..
- Macedonian
- Malagasy
- Malay
- Malayalam
- Maltese
- Maori
- Marathi
- Mongolian
- Burmese
- Nepali
- Norwegian
- Pashto
- Persian
- Punjabi
- Serbian
- Sesotho
- Sinhala
- Slovak
- Slovenian
- Somali
- Samoan
- Scots Gaelic
- Shona
- Sindhi
- Sundanese
- Swahili
- Tajik
- Tamil
- Telugu
- Thai
- Ukrainian
- Urdu
- Uzbek
- Vietnamese
- Welsh
- Xhosa
- Yiddish
- Yoruba
- Zulu
How to install an actuator motor in a poultry breeding system?
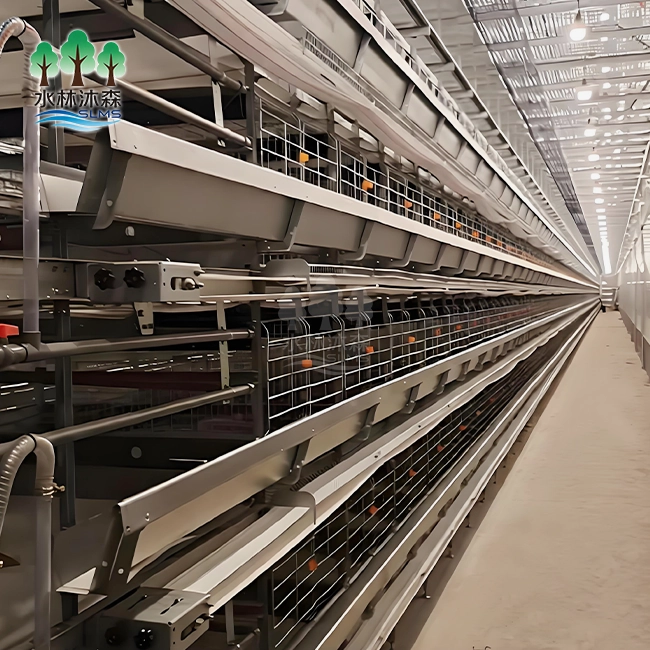
When you install a Chicken Farm Breeding Actuator Motor in your poultry business, you can turn human processes that take a lot of work into efficient automatic systems. Careful planning, exact mounting to existing equipment like air inlets or feeding lines, accurate electrical wiring with proper grounding, and thorough testing to make sure the system works well with environmental control systems are all parts of the installation process. Modern actuator motors made for poultry environments have housings that don't rust and intelligent linkage features. This makes them essential parts for farms with thousands to over 100,000 birds, where precise feeding and climate control have a direct effect on bird health and production.


Understanding Actuator Motors in Poultry Breeding Systems
Actuator motors turn electrical signals into exact movements of matter, making them the mechanical backbone of automated chicken operations. In chicken houses, these gadgets control important tasks like where the air intake is placed and how the feed lines are adjusted. They do this by automating tasks that used to be done by hand and making them more reliable.
Types of Actuator Motors Used in Poultry Facilities
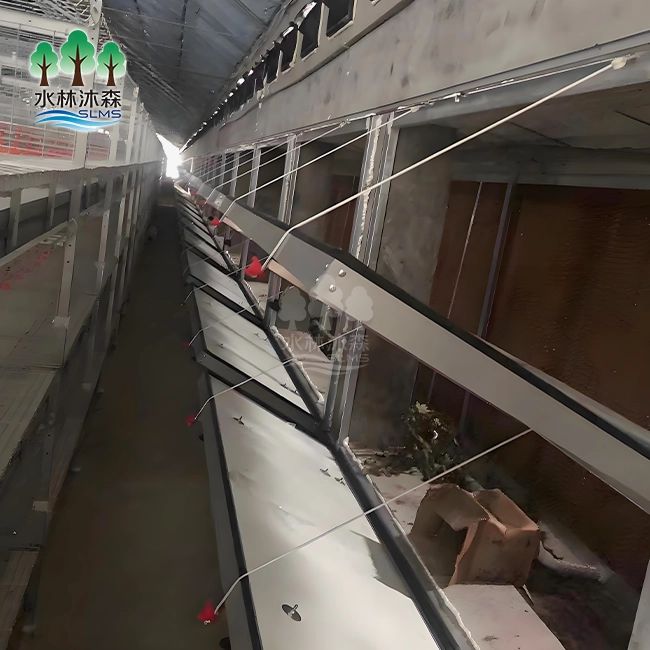
Because they move in straight lines, linear actuators are great for opening side wall vents or changing the height of curtains. Rotary types move in a circle, which works well for damper controls and underground air doors. Electric models are most common in new setups because they work well with digital control systems and let temperature and humidity sensors make changes in real time. Each type is designed to deal with a different set of problems that come up in large-scale broiler and layer operations.
Key Performance Parameters That Matter
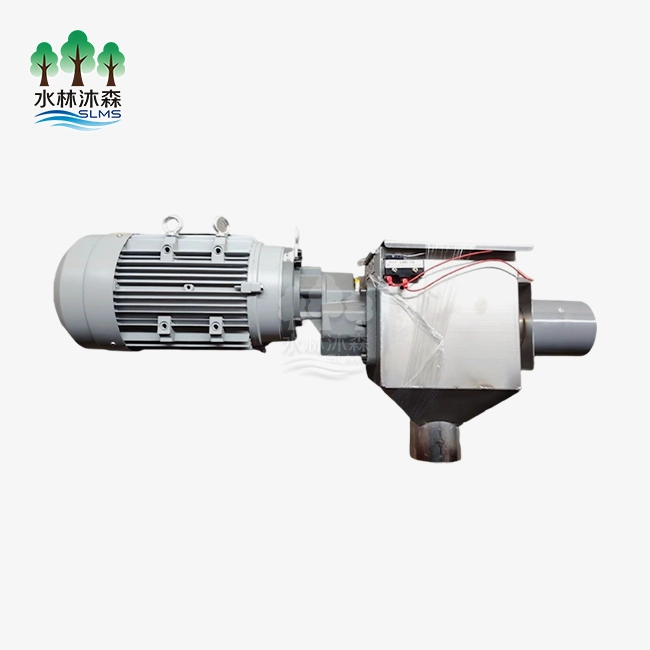
Power needs usually fall between 0.75KW and 3KW, but this depends on how much your equipment is using. Copper motors with cast iron cases provide steady power and can handle the corrosive ammonia-filled air inside chicken coops. Protection features like excess guards, trip limits, and emergency stop functions keep equipment from getting damaged when power goes out or there is an unexpected jam. These specs directly affect how well the motor works in areas with a lot of wetness and high temperatures, which are very tough conditions.
How Automation Enhances Farm Efficiency
When compared to human processes, automated actuator systems save over 40% on labor costs. Instead of going between buildings every hour, people who are in charge of facilities with 50,000 birds can change the air in several houses from a central control panel. This precise control keeps the best conditions for growth going, which raises feed conversion rates and lowers death rates. The clever coupling feature lets motors react right away to changes in the environment, making stable microclimates that help birds perform consistently throughout all production cycles.
Preparing for Installation: Pre-Installation Considerations
Whether your work goes quickly or has costly delays depends on how well you prepare. Assessing the site and choosing the right tools are the first steps in making automation improvements work.
Evaluating Your Farm Infrastructure
Walk around your building to find fixing spots that can hold the weight of the Chicken Farm Breeding Actuator Motor and the forces needed for operations. Make sure the places where the systems will be installed have enough electricity. Most systems need separate 110V or 220V AC lines with the right amperage values. Write down the trip distance needed for each job, whether you're in charge of 1200mm curtain winch systems or 300mm side wall inlets. Do your research before you order so you don't end up with motors that don't have the right stroke length for your needs.
Selecting the Right Actuator Model for Your Operation
Match the motor's specs to what your equipment needs by thinking about how much weight it needs to carry. Heavy feed line winches may need up to 15,000N of force, while small outlet controls only need about 100N. It's also important to know how fast the system is running. For example, air systems need trip speeds of 10-15 mm/s to respond quickly to temperature changes, while feeding systems work best with slower rates of 3–5 mm/s. Intelligent linkage compatibility makes sure that the motor you choose can talk to current environmental controls correctly, so you won't have to deal with any problems with integration after installation.
Gathering Essential Tools and Materials
Putting together mounting frames made for your individual motor type and fasteners that won't rust in farming settings. Prepare the right wire sizes based on the power levels of the motors. Wiring that is too small can cause fires and voltage drops that damage equipment. For connection points, include weatherproof junction boxes and heat-shrink tubes to keep water out of uncovered wire splices. Having a level, torque wrench, and voltmeter on hand makes work go more quickly and accurately, like a professional would. Insulated gloves and circuit testers are examples of safety gear that workers use to keep themselves safe while wiring.
Step-by-Step Installation Guide for Poultry Breeding Actuator Motors
A methodical construction process cuts down on mistakes and ensures long-lasting performance. This plan takes you from loading to trying the system in use.
Unboxing and Component Inspection
Carefully take the actuator motor out of its package and compare the list of parts to the actual motor. Check the case for harm from shipping and make sure the piston rod moves freely back and forth without getting stuck. Check the link terminals and power cord for any damage that could make the electricity less safe. Make sure that the mounting clamps, limit switches, and any other parts that came with it match the order you placed. Finding problems before installation saves time and effort compared to trying to figure out why something isn't working after everything is mounted.
Mounting the Motor Securely
Place the Chicken Farm Breeding Actuator Motor where it is supposed to go and make sure it is lined up correctly with the tools it will run. Use fastening tools made of galvanized or stainless steel that can handle the corrosive air in a chicken coop. Tighten all screws to the torque values recommended by the maker.
If you over-tighten, the cast housings can crack, and if you under-tighten, vibrations can cause the fasteners to come loose. Make sure that the motor axis is perfectly lined up with the feed line or air inlet device to avoid binding and wear that happens too soon. Leave enough space around the motor to let the heat escape and make it easy to do repair in the future.
Wiring Connections and Electrical Safety
Before you do any electrical work, turn off the connection at the breaker box. Follow the wiring plan that came with your motor to connect the power leads, making sure to follow the color codes for the phase, neutral, and ground wires. For connection points that will be washed, use waterproof wire nuts or terminal blocks with an IP66 rating or higher. To keep electromagnetic radiation from messing up your system, run the power lines and control signal wires separately. Secure all wires using the right strain relief techniques to keep terminal connections from being strained, which can cause contacts to become loose and fails to happen from time to time.
Calibration and Functional Testing
Turn the power back on and move the motor all the way through its full range of motion while watching for smooth, even movement. If you don't set the limit switches correctly, the motor will damage itself when it goes past safe places, which can happen if the limits aren't right. To test the overload safety, gently stop the motor from moving. It should stop right away without having to push through the resistance.
Make sure that the emergency stop features work right away when they are used. Run several runs while keeping an eye on the current draw with a multimeter to make sure the amperage stays within the limits set by the maker. This thorough testing finds problems while expert help is still on-site, instead of finding them during production situations at midnight.
Post-Installation Maintenance and Performance Optimization
Preventative repair makes equipment last longer and keeps output from stopping. Your automation investment is safe if you pay regular attention to important parts.
Routine Maintenance Schedule
Every month, wipe the piston rods clean with a soft cloth to check for dirt buildup that wears down the seals. Every three months, check to see if the fixing bracket is still tight. Over time, vibrations can loosen screws. During twice-yearly checks, make sure that electrical connections stay tight and free of rust by putting dielectric grease on leads that are likely to get wet. Most good motors have sealed-for-life gear boxes that don't need to be oiled on the inside, which makes upkeep easier. Write down everything that was found during the review so that you can set baseline performance measures that show how things are getting worse over time before they break completely.
Troubleshooting Common Issues
Most of the time, mechanical binding from misalignment or material interference is the cause of motors that stop working during operation, not electricity problems. Movement problems are usually caused by control signal wire that isn't tight enough or electromagnetic interference from equipment nearby. Too much noise means that the gears or bearings are getting worn out and are close to breaking down. The motor needs to be replaced before it fails completely and damages other equipment nearby. Talking to technical help when you notice strange symptoms keeps small problems from turning into expensive emergency fixes during busy production times.
Performance Enhancement Strategies
Upgrading to controls with finer position input resolution improves the accuracy of ventilation, keeping temperature bands tighter for better bird comfort. When you connect Chicken Farm Breeding Actuator Motor position data to your farm management software, you can use real cycle numbers instead of random time intervals to plan preventative maintenance. These technology improvements get the best return on investment by making tools last longer and increasing output by making environmental control more consistent.
Procurement and Supplier Insights for Poultry Breeding Actuator Motors
Making strategic choices about what to buy affects both the original costs and the long-term costs of running the business. System dependability depends on choosing the right provider partnership.
Critical Supplier Selection Criteria
Warranty coverage shows how confident the seller is in the quality of the product. Reputable makers offer extensive warranties that cover flaws and early failures for at least one year. When solving complicated installation problems or figuring out what's wrong with an operation, quick expert support is very helpful. Check the shipping company's dependability by calling past customers for examples. Delays in shipments can throw off building schedules and make projects take longer than planned. On-site installation services from suppliers add value by making sure everything is set up correctly from the start, lowering the risk of mistakes that cost a lot of money during implementation.
Understanding Price Versus Value
At first glance, cheap choices may seem appealing, but they're usually made of poor materials that rust quickly in ammonia-filled chicken coops, meaning they need to be replaced more often, which costs more than the savings. Even though they cost more up front, premium motors made with stainless steel parts and IP66-rated casings last for years without any problems. When multiple homes are being upgraded at the same time, bulk buy plans from well-known suppliers can cut per-unit costs by a large amount. Customization features let you change the specs to fit your facility's needs instead of settling for off-the-shelf options that don't work as well as they could.
Leveraging Technical Support Resources
Manufacturers who offer installation guides and detailed instructions make it easier for support staff who aren't used to automated systems to learn how to use them. Being able to talk to application engineers can help you figure out the best motor setups for complicated installations with non-standard hardware. After-sales help makes sure that problems with the machine can be fixed quickly, reducing downtime that hurts bird care and production. Building connections with suppliers who see customer success as a partnership, not a transaction, adds value that lasts beyond the purchase of tools.
Conclusion
When you install a Chicken Farm Breeding Actuator Motor, you can switch from manual processes that require a lot of work to efficient automatic systems that improve bird performance and lower running costs. To be successful, you need to carefully choose equipment that fits the needs of the application, carefully place it using the best electrical and mechanical methods, and keep it in good shape so it lasts longer.
Investing in good automation equipment will pay off in the form of lower labor costs, more consistent working conditions, and better performance metrics that will make you more competitive in the poultry business. Working with skilled providers who offer full technical support is the best way to make sure that implementation goes smoothly and that operating excellence is maintained.
FAQ
How often do actuator motors require maintenance?
Sealing actuator motors made for chicken coops don't need much maintenance—biannual checks are usually enough for most tasks. During these checks, clean the piston rods of any dust that has built up, make sure the fixing hardware is tight, and look for rust in the electrical connections. Inspections should be done every three months for high-cycle uses like ventilation systems that need to be changed often. Inspections should be done once a year for low-use equipment like seasonal curtain controls without affecting their reliability.
Can I install actuator motors myself or should I hire professionals?
Using the manufacturer's directions and installation videos, experienced maintenance workers who know a lot about electricity can easily install actuator motors. Professional installation services make sure that everything is set up correctly from the start, which is especially helpful for complex integrations with multiple synced motors or specialized control systems. A lot of providers offer on-site fitting help, which is helpful for businesses that are automating for the first time or upgrading whole buildings at the same time.
What indicates an actuator motor needs replacement?
Noise levels that are too high, inaccurate tracking, or cracks in the case that can be seen are all signs that the device is getting close to the end of its useful life. Motors that need to have their limit switches adjusted often or have slow response times are showing that internal wear is lowering their performance. Tracking cycle counts can help you figure out when to replace a motor. Motors that are getting close to their manufacturer-specified life expectancies should be replaced during routine maintenance, instead of waiting for them to break down in the middle of a production run.
Get Professional Support from a Trusted Chicken Farm Breeding Actuator Motor Supplier
Shuilin Musen Aquaculture Equipment Co., Ltd. has eight years of experience automating farming tasks that they can bring to your chicken business. Our engineering team creates custom actuator motor solutions that meet the specific needs of your building. We also offer full technical support, including installation videos and service on-site.
Each unit has copper motors with cast iron cases, the ability to use clever linkages, and multiple safety systems that have been tried using strict quality control procedures. Get in touch with our team at wangshuaislms@gmail.com to talk about how our power range of 0.75KW to 3KW can help your ventilation controls, manure removal tools, and feeding systems work better. Our guarantee covers all of this for a year.
References
1. American Society of Agricultural and Biological Engineers. (2019). "Environmental Control Systems for Poultry Housing." ASABE Standards EP270.5, St. Joseph, Michigan.
2. Donald, J. (2018). "Automation Technologies in Modern Poultry Production Systems." Poultry Science Journal, Volume 97, Issue 6, pp. 2112-2121.
3. Midwest Plan Service. (2017). "Mechanical Ventilation Design Guidelines for Livestock Housing." MWPS-32, Iowa State University Extension, Ames, Iowa.
4. National Chicken Council. (2020). "Best Practices for Broiler Chicken Welfare and Management." Animal Welfare Guidelines and Audit Checklist, Washington, D.C.
5. Purswell, J.L. and Dozier, W.A. (2019). "Precision Environmental Control in Commercial Broiler Housing." Agricultural Engineering International Journal, Volume 21, Number 3, pp. 45-58.
6. Xin, H. and Berry, I.L. (2018). "Actuator Selection and Installation for Livestock Facility Automation." Transactions of the ASABE, Volume 61, Issue 4, pp. 1347-1356.
Learn about our latest products and discounts through SMS or email